
記事編集に使えそうなテキストエディターを探していたところTOAST-U I Editorがかなりいい感じだったので 軽く使い方をまとめようと思います。
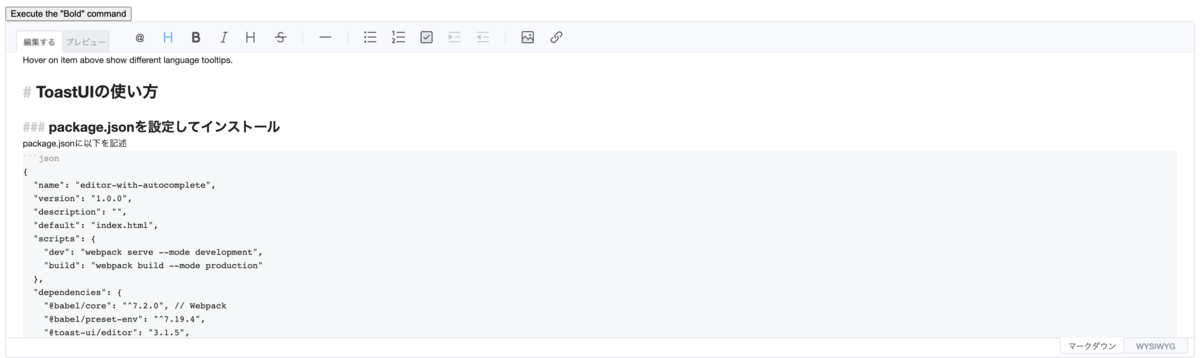
今回作成したサンプルはこんな感じです。
導入
1. 構成

2. package.jsonを設定してインストール
package.jsonに以下を記述。
{
  "name": "editor-with-autocomplete",
  "version": "1.0.0",
  "description": "",
  "default": "index.html",
  "scripts": {
    "dev": "webpack serve --mode development",
    "build": "webpack build --mode production"
  },
  "dependencies": {
    "@babel/core": "^7.2.0", // Webpack
    "@babel/preset-env": "^7.19.4",
    "@toast-ui/editor": "3.1.5",
    "@toast-ui/editor-plugin-color-syntax": "^3.1.0",
    "babel-loader": "^8.2.5",
    "css-loader": "^6.7.1",
    "style-loader": "^3.3.1",
    "html-loader": "^4.2.0",
    "html-webpack-plugin": "^5.5.0",
    "webpack": "^5.74.0",
    "webpack-cli": "^4.10.0",
    "webpack-dev-server": "^4.11.1"
  }
}
インストール。
npm install
"@toast-ui/editor": "3.1.5",
"@toast-ui/editor-plugin-color-syntax": "^3.1.0",
この2つがtoast-uiのパッケージであとはwebpack関連のパッケージになります。
3. ./src/index.html
<!DOCTYPE html>
<html>

<head>
    <title>toastEditor</title>
    <meta charset="UTF-8" />
</head>

<body>
    <div id="editor"></div>
</body>

</html>
4. ./webpack.config.js
const HtmlWebpackPlugin = require('html-webpack-plugin')

module.exports = {
    module: {
        rules: [
            {
                test: /\.js$/,
                loader: "babel-loader",
            },
            {
                test: /\.css$/,
                use: ["style-loader", "css-loader"],
            },
            {
                test: /\.html$/,
                loader: "html-loader"
            }
        ],
    },
    plugins: [
        new HtmlWebpackPlugin({
            template: "./src/index.html"
        })
    ],
    devServer: {
        static: {
            directory: "./dist",
        },
    },
};
js、css、htmlをdist以下に出力してるだけ。
TOAST-UIの使い方
通常の設定
ここからが本題、TOAST-UIの設定を追加していきます。 ./src/index.jsを以下のように記述して作成してください。
import "@toast-ui/editor/dist/toastui-editor.css";
import Editor from "@toast-ui/editor";
import '@toast-ui/editor/dist/i18n/ja-JP';
import colorEditingText from "@toast-ui/editor-plugin-color-syntax";

const editor = new Editor({
  el: document.querySelector('#editor'),
  previewStyle: 'tab',
  height: '500px',
  initialValue: 'Hover on item above show different language tooltips.',
  toolbarItems: [
    ['heading', 'bold', 'italic', 'strike'],
    ['hr'],
    ['ul', 'ol', 'task', 'indent', 'outdent'],
    ['image', 'link'],
  ],
  language: 'ja',
  placeholder: 'Please enter text.',
  plugins: [colorEditingText]
});

window.editor = editor;
el: どこにdocumentのどこにeditorを作るか。previewStyle: プレビューの表示方法の設定tab|verticalがあります。initialValue: エディター内のテキストエリアの初期値。toolbarItems: ツールバーに表示するアイコンの配置設定をします。
配列毎にまとまりを意味してくれていて、配列の後には区切り線が追加されるようになっています。アイコンの意味自体は大体わかると思うので省略。language: アイコンにマウスホバーしたときに表示されるツールチップの言語設定です。
import '@toast-ui/editor/dist/i18n/ja-JP';
こちらを入れないと日本語適応されないので注意。
* plugins: プラグイン設定です。colorEditingTextはタイポがある場合に教えてくれます。
カスタムアイコンの設定
./src/index.jsを以下のように記述してカスタムアイコンの作成をします。
import "@toast-ui/editor/dist/toastui-editor.css";
import Editor from "@toast-ui/editor";
import '@toast-ui/editor/dist/i18n/ja-JP';
import colorEditingText from "@toast-ui/editor-plugin-color-syntax";

const editor = new Editor({
  el: document.querySelector('#editor'), // 1
  previewStyle: 'tab', // 2
  height: '500px',
  initialValue: 'Hover on item above show different language tooltips.',
  toolbarItems: [
    ['heading', 'bold', 'italic', 'strike'],
    ['hr'],
    ['ul', 'ol', 'task', 'indent', 'outdent'],
    ['image', 'link'],
  ],
  language: 'ja',
  placeholder: 'Please enter text.',
  plugins: [colorEditingText]
});

+editor.insertToolbarItem({ groupIndex: 0, itemIndex: 0 }, {
+  name: 'myItem',
+  tooltip: 'カスタムボールド',
+  command: 'bold',
+  text: '@',
+  className: 'toastui-editor-toolbar-icons first',
+  style: { backgroundImage: 'none' }
+});

window.editor = editor;
groupIndex: toolbarItemsのグループの何番目にカスタムアイコンを追加するかitemIndex: 上記のグループの何番目にアイコンを追加するかtootip: マウスオーバーした際に表示される文字command: 実際に適応される処理text: アイコン
無関係なボタンを押したときにTOAST-UIの処理を実行する
./src/index.jsを修正
import "@toast-ui/editor/dist/toastui-editor.css";
import Editor from "@toast-ui/editor";
import '@toast-ui/editor/dist/i18n/ja-JP';
import colorEditingText from "@toast-ui/editor-plugin-color-syntax";

const editor = new Editor({
  el: document.querySelector('#editor'), // 1
  previewStyle: 'tab', // 2
  height: '500px',
  initialValue: 'Hover on item above show different language tooltips.',
  toolbarItems: [
    ['heading', 'bold', 'italic', 'strike'],
    ['hr'],
    ['ul', 'ol', 'task', 'indent', 'outdent'],
    ['image', 'link'],
  ],
  language: 'ja',
  placeholder: 'Please enter text.',
  plugins: [colorEditingText]
});

editor.insertToolbarItem({ groupIndex: 0, itemIndex: 0 }, {
  name: 'myItem',
  tooltip: 'カスタムボールド',
  command: 'bold',
  text: '@',
  className: 'toastui-editor-toolbar-icons first',
  style: { backgroundImage: 'none' }
});

+ document.getElementById('btn').addEventListener('click', () => {
+   editor.exec('bold');
+ });

window.editor = editor;
id="btn"をクリックしたときにboldを実行してくれるようになりました。
./src/index.htmlにbtnを追加
<!DOCTYPE html>
<html>

<head>
    <title>toastEditor</title>
    <meta charset="UTF-8" />
</head>

<body>
+    <button id="btn" class="btn">Execute the "Bold" command</button>
    <div id="editor"></div>
</body>

</html>
実行
あとは実行しましょう。
npm run dev
localhost:8080で確認してみてください。
これで大体TOAST-UI Editorの使い方は網羅できているかなと思います。 他にも色々エディターのパッケージはありましたが、TOAST-UIは個人的にはかなり使いやすいし、見た目もいい感じかなと思いました。 ぜひ参考にしてみてください。